Lumieru的知识库

  • 首页

  • 标签

  • 分类

  • 归档

  • 搜索

A better method to recalculate normals in unity

发表于 2022-04-28 | 分类于 Graphics

A BETTER METHOD TO RECALCULATE NORMALS IN UNITY

原文链接

normal1

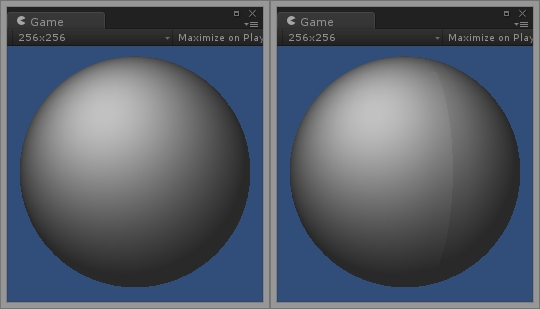
A visible seam showing after recalculating normals in runtime.

You might have noticed that, for some meshes, calling Unity’s built-in function to RecalculateNormals(), things look different (i.e. worse) than when calculating them from the import settings. A similar problem appears when recalculating normals after combining meshes, with obvious seams between them. For this post I’m going to show you how RecalculateNormals() in Unity works and how and why it is very different from Normal calculation on importing a model. Moreover, I will offer you a fast solution that fixes this problem.

This article is also very useful to those who want to generate 3D meshes dynamically during gameplay and not just those who encountered this problem.

Some background…

I’m going to explain some basic concepts as briefly as I can, just to provide some context. Feel free to skip this section if you wish.

阅读全文 »

Weighted Vertex Normals

发表于 2022-04-28 | 分类于 Graphics

Weighted Vertex Normals


原文链接

3DSMAX Plugin

A popular MaxScript plugin for 3DSMAX (previously hosted on GitHub) is now available here.

Introduction

When rendering 3D triangle mesh geometry, vertex normal vectors (‘normals‘) need to be computed either in real-time or at design-time, to achieve proper lighting of curved surfaces. There are a few ways to do this, however, the most commonly used method has significant flaws. This article illustrates two of those problems, and proposes a practical and robust solution.

The assumption is made that the reader is familiar with surface normal vectors and their application in 3D graphics rendering.

Notes

Geometry may have ‘hard edges’ (sometimes called ‘sharp edges’), in which case multiple vertex normals may lie at the same vertex position. This is covered here for completeness sake only; the proposed enhancements do not have any effect on the presence or appearance of hard edges.

The included code uses per-polygon smoothing-groups (most popular in 3D content authoring software) to achieve hard edges, though this can be substituted by any (algorithmic) criteria (e.g. angle between surface normals greater than x degrees).

Hard edges can also be created by duplicating vertices (for optimal rendering on modern graphics hardware), but for simplicity we’ll assume there are no duplicate vertices present in the model.

Also note that the pseudo-code presented herein is far from optimal, and can be optimized in many ways.

阅读全文 »

Unity动画系统原理

发表于 2021-09-03 | 更新于 2022-04-28 | 分类于 GameEngine

通用结构

float4是一个float[4]的数组,主要对应simd的数据类型,存储的可以是vector4或者quaternion,可以代表平移,旋转或者缩放。
xform里面有 float4的t,q,s,就是simd版的transform信息。

AvatarConstant

1
std::string AvatarBuilder::BuildAvatar(Avatar& avatar, const Unity::GameObject& go, bool doOptimizeTransformHierarchy, const HumanDescription& humanDescription, Options options)

会创建AvatarConstant,会用到下面这些结构体

阅读全文 »

AC自动机:如何实现敏感词过滤?

发表于 2020-12-04 | 分类于 算法

AC自动机:如何实现敏感词过滤

原文链接

文章目录

  • 敏感词过滤
  • AC自动机
  • 失效指针
  • 匹配
  • 完整代码
  • 性能计算

敏感词过滤

在一些社交平台如微博、微信、网络游戏等地方,难免会有一些不法分子散播色情、反动等内容,亦或是网友们的互相谩骂、骚扰等。为了净化网络环境,各大社交平台中都会有敏感词过滤的机制,将那些不好的词汇屏蔽或者替换掉

那你是否有想过,这个功能是如何实现的呢?

在我之前的博客中,介绍了四种单模式字符串匹配算法,分别是BF、RK、BM、KMP,以及一种多模式字符串匹配算法,Trie树。

对于单模式字符串匹配算法来说,如果我们要进行匹配,就需要针对每一个查询词来对我们输入的主串进行匹配,而随着词库的增大,匹配的次数也会变得越来越大,很显然,这种做法是行不通的。

那么我们再看看多模式字符串匹配算法,Trie树。对于Trie树来说,我们可以一次性将所有的敏感词都加入其中,然后再遍历主串,在树中查找匹配的字符串,如果找不到,则使Trie树重新回到根节点,再从主串的下一个位置开始找起。

Trie树的这种方法,就有点像BF中的暴力匹配,因为它没有一个合理的减少比较的机制,每当我们不匹配就需要从头开始查,大大的降低了执行的效率,对于一个高流量的社交平台来说这是不能容许的,毕竟没有人希望自己输入了一句话后要隔上一大段时间才能发出去。那么我们是否可以效仿KMP算法,添加一个类似next数组的机制来减少不必要的匹配呢?这也就是AC自动机的由来


阅读全文 »

AWS EC2实例的带宽数据

发表于 2020-04-07 | 分类于 Cloud

原文出处

What is the maximum network throughput of your EC2 instance? The answer to this question is key to choosing the type of an instance or defining monitoring alerts on network throughput.

EC2 Network Performance Cheat Sheet

Unfortunately, you will only find very vague information about the networking capabilities of EC2 instances within AWS’s service description and documentation. That is why I run a network performance benchmark for almost all EC2 instance types within the last few days. The results are compiled into the following cheat sheet.

The data analysis in the following table shows the burst and baseline throughput of each instance type. The burst throughput is defined as the 95th percentile, which means the throughput was at least reached for 3 minutes. The baseline throughput is defined as the 10th percentile, which means the throughput was reached at least for 54 minutes.

阅读全文 »

UMA自定义材质设置和带cloth的slot制作指南

发表于 2020-03-06 | 分类于 Unity

UMA的贴图处理

UMA检测到贴图需要处理时,就会调用TextureProcessPROCoroutine.cs文件里的workerMethod()来合并贴图,并把最终结果输出到一个RenderTexture中。真正合成贴图的操作是在TextureMerge.cs中完成的。对于UMA提供的5中贴图类型,只有其中三种是需要调用shader来进行合并处理的,剩下的两种不处理贴图,只是把原图设置到目标材质,或者把颜色设置到目标材质。具体的操作如下表

贴图类型 操作 对应shader
Texture 利用shader合图 AtlasShader
DiffuseTexture 利用shader合图 AtlasDiffuseShader
NormalMap 利用shader合图 AtlasNormalShader
MaterialColor 不处理贴图,只设置颜色 无
TintedTexture 不处理贴图,设置颜色和原始贴图 无

上面提到的3个shader,除了需要一张_MainTex外,还需要一张_ExtraTex,这张_ExtraTex是作为alpha mash来使用的,不同的shader有不同的用法。还有两个颜色参数_Color和_AdditiveColor,对应的是recipe中设置的乘法颜色和加法颜色。

这个_ExtraTex默认是来自于overlay中设置的Alpha Mask的,如果改overlay中没有设置Alpha Mask,那么就用改overlay的第一张贴图的alpha通过。

三个shader对于这张_ExtraTex的使用是不同的,具体如下:

  • AtlasShader

    1
    2
    3
    4
    5
    6
    half4 frag (v2f i) : COLOR
    {
    half4 texcol = tex2D (_MainTex, i.uv) * _Color + _AdditiveColor;
    half4 maskcol = tex2D (_ExtraTex, i.uv);
    return texcol * maskcol.a;
    }

_ExtraTex的alpha通道乘以_MainTex的所有通道,得到最终值。

阅读全文 »

Unity的MemoryPool模块

发表于 2020-01-14 | 分类于 GameEngine

原文

原文出处

MemoryPool主要是对内存分配的碎片化和频繁分配和释放进行优化。

结构

MemoryPool的设计结构如下:

1
2
3
4
5
6
7
8
9
10
11
12
13
14
15
16
17
18
public class MemoryPool
{
...

private:
struct Bubble
{
char data[1]; //只是一个占位符,其实这个成员变量加不加sizeof(Block)大小都是1个字节
};

typedef dynamic_array<Bubble*> Bubbles;

Bubble m_Bubbles;

void* m_HeadOfFreeList;

...
}
阅读全文 »

UMA中Mesh的管理和合成

发表于 2019-11-19 | 分类于 Unity
  1. 名词解释

    • UMA.UMABlendFrame:

      在UMAMeshData.cs文件中

      1
      2
      3
      4
      5
      6
      7
      public class UMABlendFrame
      {
      public float frameWeight = 100.0f; //should be 100% for one frame
      public Vector3[] deltaVertices = null;
      public Vector3[] deltaNormals = null;
      public Vector3[] deltaTangents = null;
      };
      • 一个BlendShape可以包含很多帧,最后一帧(frameWeight = 100.0f)是这个BlendShape的最终形态,而中间还可以有很多过度的平滑帧(就像放动画一样)。他们一般都是按frameWeight从小到大排列的。
      • UMABlendFrame代表BlendShape的某一帧。在大部分情况下,一个BlendShape只有一帧。
      • frameWeight表示这一帧是最终形态的百分之多少。
      • deltaVertices数组,大小和整个base mesh的顶点数相同。数组中的每一项,表示这一帧BlendShape的顶点和baseMesh中相应顶点的位置差(offset)。baseMesh中的顶点位置加上这个deltaVertices可以得到BlendShape中顶点的绝对位置。
      • deltaNormals数组,意义同上,只是表示的是法线。
      • deltaTangents数组,意义同上,只是表示的是切线。
    • UMA.UMABlendShape:

      在UMAMeshData.cs文件中

      1
      2
      3
      4
      5
      public class UMABlendShape
      {
      public string shapeName;
      public UMABlendFrame[] frames;
      }
      • 表示一个完整的BlendShape,里面可以包含多个帧。

        阅读全文 »

UMA是如何动态生成Unity的Avatar的

发表于 2019-11-16 | 更新于 2019-11-19 | 分类于 Unity
  1. 名词解释

    • UnityEngine.SkeletonBone:

      • 是一个Struct
      • Details of the Transform name mapped to the skeleton bone of a model and its default position and rotation in the T-pose.
      • 表示模型中的骨骼,其中带有骨骼的名字,还有在TPose时的平移缩放旋转信息。
    • UnityEngine.HumanBone:

      • 是一个Struct
      • The mapping between a bone in the model and the conceptual bone in the Mecanim human anatomy.
      • 表示模型中的骨骼与Mecanim人体解剖学中的概念性骨骼之间的映射,其中模型中骨骼的名字,和Mecanim骨骼的名字,还有这个定义了这个骨骼的肌肉的旋转极限的HumanLimit。
    • UnityEngine.HumanLimit:

      • 是一个Struct
      • This class stores the rotation limits that define the muscle for a single human bone.
      • 表示一根骨骼的肌肉的旋转极限。
    • UMA.UmaTPose:

      • UMA->Extract T-Pose生成的文件,就是由这个类的实例序列化来的。
      • 是一个Classbaok
      • UMA用来表示和存储Unity中的Avatar的一个类,其中包含了:

        • SkeletonBone的数组,用来记录在TPose时所有模型骨骼的信息(包括在config unity avatar时所有的节点,比如Model节点等,不光光是代表骨骼的节点)。
        • HumanBone的数组,用来记录模型骨骼和Mecanim骨骼的一一映射关系。
        • 还包含了Muscles设置中的一些配置信息。
    • UnityEngine.HumanDescription:

      • 是一个Struct
      • 其实就是Unity版的UmaTPose,其中包含了SkeletonBone的数组和HumanBone的数组和其他的一些avatar配置,可以用这个来创建一个新的avatar。
      阅读全文 »

UMA 301视频教程备忘录

发表于 2019-11-14 | 更新于 2019-11-23 | 分类于 Unity
  1. 制作一个Base Model

    • 用Adobe Fuse生成一个光头T pose模型,导出上传到Mixamo,Mixamo会自动为这个模型绑定骨骼,还要生成一些脸部表情的Blend Shapes。
    • 导入Blender,删除一些多余的骨骼,可以看到有很多面部表情的Blend Shapes。
    • 还可以利用其他的工具来生成模型,比如Daz。

      UMA 301 - Part 1 Creating a Base Model

  2. 修正一些不对的地方

    • Fuse导入Blender的模型,normal map没有起作用,要调整一下的。
    • 模型的全局Scale不是1,Rotation也不都是0,需要apply scale & rotation,把他们烘培到mesh顶点上,让scale和rotation归一化。
    • 要在原有的以Hip为root的骨架上,在加两个骨骼Global->Position,这是UMA需要的骨架结构。

      UMA 301 - Part 2 Fixing Scale & Global Bones

  3. 添加一些调整用的骨骼来改变人物外形

    • 因为现有的骨骼,你在调整上级的scale的时候,所有的下级都会受到影响,这不是我们想要的,所以我们需要在调整的地方复制一个骨骼(没有下级)。
    • 然后把复制的骨骼作为原骨骼的子(本来他们应该是同一级的),并且把原骨骼的权重全部转移到复制的骨骼上(原骨骼不在影响任何顶点,所有的影响都到复制的骨骼上了)。
    • 以上步骤是针对现有的骨骼的,如果要新建一个调整骨骼(一般都是叶子节点了),那么先新建好骨骼,放在对应的层级下面,然后再刷顶点权重。

      UMA 301 - Part 3 Creating Adjustment Bones

  4. 创建BlendShape来改变人物外形

    • 每个BlendShape(morph target)都是原始mesh的一个copy,所以如果有很多blendshape的话,会占用很多内存的
    • 在Blender中新建一个ShapeKey,然后进入编辑模式,改变一些顶点,就可以创建一个新的BlendShape了。

      UMA 301 - Part 4 Creating Blendshapes

阅读全文 »
12…5

Lumieru

46 日志
8 分类
17 标签
© 2022 Lumieru
由 Hexo 强力驱动 v3.9.0
|
主题 – NexT.Pisces v7.1.1